
Out of the box, Azure Data Lake Storage Gen2 provides redundant storage. Therefore, the data in your Data Lake(house) is resilient to transient hardware failures within a datacenter through automated replicas. This ensures durability and high availability. In this blog post, I provide a backup strategy on how to further protect your data from accidental deletions, data corruption, or any other data failures. This strategy works for Data Lake as well as Data Lakehouse implementations. It uses native Azure services, no additional tools, software, or licenses are required.
How about the High Availability features?
The Data Lake uses Azure Storage, which stores multiple copies of the data so that it is protected from planned and unplanned events, including transient hardware failures, network or power outages, and massive natural disasters. This redundancy ensures that your storage account meets its availability and durability targets even in the face of such failures. This redundancy however does not mean the Data Lake is protected against data failures like corruption or accidental deletion. That is why we need to take additional measures, described in this Data Lake Backup Strategy.
Overview of measures
The Data Lake Backup Strategy uses a combination of techniques and features to get the best functionality and performance for an acceptable cost:
- Soft delete for containers
- Soft delete for blobs
- Resource lock on the Storage Account
- Delta Lake time travel
- Self-built automated backup process (copying a part of the Data Lake data to a secondary location)
- Backup ‘vault’ to store subsets of the Data Lake indefinitely
- Lifecycle Management Policies
- Storage Account access tiers (hot/cool/archive)
Additional info / limitations
- The strategy implements all measures on the production Data Lake. The other environments (dev/test/acc) will not implement the self-built automated process of copying (a part of) the Data Lake data to a secondary location, to lower costs.
- Soft delete for blobs in accounts that have the hierarchical namespace feature enabled is currently in public preview. The Data Lake has the hierarchical namespace feature enabled. To enroll in this public preview, please see the link to a form on the Soft delete for blobs page in the Microsoft Docs. Please see the Supplemental Terms of Use for Microsoft Azure Previews for legal terms that apply to Azure features that are in beta, preview, or otherwise not yet released into general availability.
- To increase the availability guarantees of the Data Lake, it is possible to have the secondary Storage Account for backups in a different region (e.g. North Europe instead of West Europe).
- This strategy considers that all resources are secured with Azure Virtual Network and are connected via Private Endpoints, driving the solution design of this strategy.
Detailed implementation description
Soft delete for containers
The first aspect of this strategy will be to enable the soft delete for container feature of the Azure Storage Account of our Data Lake (if not already enabled). This will help as a ‘first layer of defense’ to protect the Data Lake. To learn how to enable container soft delete, see Enable and manage soft delete for containers.
More info from the Azure Docs: Container soft delete protects your data from being accidentally deleted by maintaining the deleted data in the system for a specified period of time. During the retention period, you can restore a soft-deleted container and its contents to the container’s state at the time it was deleted. After the retention period has expired, the container and its contents are permanently deleted.
When you enable container soft delete, you can specify a retention period for deleted containers that is between 1 and 365 days. The default retention period is 7 days. During the retention period, you can recover a deleted container by calling the Restore Container operation.
When you restore a container, the container’s blobs and any blob versions and snapshots are also restored. However, you can only use container soft delete to restore blobs if the container itself was deleted. To restore a deleted blob when its parent container has not been deleted, you must use blob soft delete or blob versioning.
Storage accounts with a hierarchical namespace enabled for use with Azure Data Lake Storage Gen2 are also supported.
I recommend using a short retention period to better understand how the feature will affect your bill. The minimum recommended retention period by Microsoft is seven days, which seems good to me.
Data in deleted containers is billed at the same rate as active data. I don’t expect it will go unnoticed when an entire container of the Data Lake is deleted  , I even don’t expect it to happen at all, so I expect a zero or really low-cost impact of enabling this particular feature for the Data Lake Storage Account.
Soft delete for blobs
And as a companion to the soft delete for containers, we will also enable the soft delete for blobs feature of the Azure Storage Account of our Data Lake (if not already enabled). This will also help as a ‘first layer of defense’ to protect the Data Lake, especially for the data in the first ‘raw’ zone of the lake (05_store) as that data is not stored in Delta format and we can’t use the Delta table time travel feature for that data to recover earlier versions.
I recommend using a short retention period to better understand how the feature will affect your bill. The minimum recommended retention period by Microsoft is seven days, which seems good to me.
To learn how to enable blob soft delete, see Enable and manage soft delete for blobs.
More info from the Azure Docs: Blob soft delete protects an individual blob, snapshot, or version from accidental deletes or overwrites by maintaining the deleted data in the system for a specified period of time. During the retention period, you can restore a soft-deleted object to its state at the time it was deleted. After the retention period has expired, the object is permanently deleted.
All soft deleted data is billed at the same rate as active data. You will not be charged for data that is permanently deleted after the retention period elapses.
Soft delete for blobs in accounts that have the hierarchical namespace feature enabled (our Data Lake!) is currently in public preview. To enroll in this public preview, please see the link to a form on the Soft delete for blobs page in Microsoft Docs.
Please see the Supplemental Terms of Use for Microsoft Azure Previews for legal terms that apply to Azure features that are in beta, preview, or otherwise not yet released into general availability.
Important! This setting probably causes the storage costs to go up.
Delta table time travel
Another ‘first layer of defense’ in our strategy is the time travel feature of the Delta tables in our Data Lake. Except for the first ‘raw’ zone, all zones use Delta tables. With this time travel feature, Delta automatically versions the data that you store, and you can access any historical version of that data within a configured retention period. Please check out the Microsoft Docs if you want to learn more about the time travel feature in Delta tables.
I recommend using a short retention period to better understand how the feature will affect your bill. Similar to the soft delete for blob retention period, I think seven days seems good to me. The default Delta time travel retention period is 7 days (because the default delta.deletedFileRetentionDuration
Note: Databricks recommends that you set a retention interval to be at least 7 days because old snapshots and uncommitted files can still be in use by concurrent readers or writers to the table. If VACUUM cleans up active files, concurrent readers can fail or, worse, tables can be corrupted when VACUUM deletes files that have not yet been committed. You must choose an interval that is longer than the longest running concurrent transaction and the longest period that any stream can lag behind the most recent update to the table.
The command to access a different version of the data is very straightforward. For example, in SQL it’s like this:
SELECT count(*) FROM my_table TIMESTAMP AS OF "2021-01-01 01:30:00.000"Run VACUUM
As general advice, it is smart to run the VACUUM command for Delta tables. Azure Databricks does not automatically trigger VACUUM operations. The VACUUM command recursively travels through the directories associated with the Delta table and removes data files that are no longer in the latest state of the transaction log for the table and are older than the retention threshold.
To learn more about how to execute the VACUUM command, you can check out the Azure Docs. An example Python script that updates all tables in the Databricks databases matching a specified filter is shown below. Note: this script also executes the COMPUTE STATISTICS command on each table. And it has a commented line of code to show
| database_names_filter = "20_silver*" | |
| try: | |
| dbs = spark.sql(f"SHOW DATABASES LIKE '{database_names_filter}'").select("databaseName").collect() | |
| dbs = [(row.databaseName) for row in dbs] | |
| for database_name in dbs: | |
| print(f"Found database: {database_name}, performing actions on all its tables..") | |
| tables = spark.sql(f"SHOW TABLES FROM `{database_name}`").select("tableName").collect() | |
| tables = [(row.tableName) for row in tables] | |
| for table_name in tables: | |
| #spark.sql(f"ALTER TABLE `{database_name}`.`{table_name}` SET TBLPROPERTIES ('delta.logRetentionDuration'='interval 30 days', 'delta.deletedFileRetentionDuration'='interval 7 days')") | |
| spark.sql(f"VACUUM `{database_name}`.`{table_name}`") | |
| spark.sql(f"ANALYZE TABLE `{database_name}`.`{table_name}` COMPUTE STATISTICS") | |
| except Exception as e: | |
| raise Exception(f"Exception:`{str(e)}`") |
 by
by Resource lock on the Storage Account
It is strongly recommended to lock all your storage accounts with an Azure Resource Manager lock to prevent accidental or malicious deletion of the entire resource. Check out the Azure Docs to learn how to do that.
There are two types of Azure Resource Manager resource locks:
- A CannotDelete lock prevents users from deleting a storage account, but permits reading and modifying its configuration.
- A ReadOnly lock prevents users from deleting a storage account or modifying its configuration, but permits reading the configuration.
I recommend applying the CannotDelete lock, as the other type can cause problems with accessing the Storage Account because the List Keys action will be blocked.
Automated Backup Process – to copy data to a secondary account
This Data Lake Backup Strategy can’t rely on the soft delete and Delta time travel features alone. Those features are great as a ‘first line of defense’ but we want more recovery options.
In the future, I expect Microsoft will have native support for features like Blob versioning and snapshots in Azure Data Lake Storage Gen 2 (Storage Account with hierarchical namespace enabled). But for now, those features are not available.
Because of that, we currently need our own method of versioning the Data Lake. A ‘simple’ copy of the data stored in a separate location will do fine. We will keep multiple of those copies over time, and automatically remove the oldest copy after a certain period. An efficient method to copy data from one storage account to another – with both accounts securely connected via Azure Virtual Network and Private Endpoints – is to use the AzCopy command-line utility.
AzCopy uses server-to-server APIs, so data is copied directly between storage servers. These copy operations don’t use the network bandwidth of your computer. Other methods – including the Azure Data Factory copy activity and Azure Databricks notebooks – copy data through the Azure Virtual Machine (or container) in the background and this will severely limit performance and increase cost. The client where you run AzCopy on must have network access to both the source and destination storage accounts, to enable these server-to-server APIs. But, running the AzCopy will not have a substantial impact on the client. We will use the Azure DevOps agent machine as our client.
There are multiple ways to authenticate to Azure Storage with the AzCopy utility. We will append a SAS token to the URL of source and destination directories.
./azcopy.exe copy $SrcFullPath $DstFullPath --block-blob-tier Cool --recursive --overwrite=ifsourcenewer --log-level=NONE --include-after $IncludeAfterDateTimeISOStringCheck out this page for more info on the azcopy copy command.
Daily backup
For the Delta tables in our Data Lake, the time travel feature provides a way to restore older data versions, up to a week later. Hence, no need to have a daily backup for the Delta tables data. But the ‘raw’ zone in the Data Lake only has the ‘soft delete for blobs’ feature (because it is not stored in Delta tables). Hence, we need a daily backup of the ‘raw’ zone data.
The AzCopy command has a parameter called --include-after. This will copy only those files modified on or after the given date/time. We will use that to have an incremental daily backup, storing only the modified/new files each day, since the day before. This will really help to reduce costs of the data in the backup storage Account, as the ‘raw’ zone in the Data Lake potentially grows quite large (in terms of size and number of files).
These daily backups are stored in a separate container in the backup Storage Account, called daily.
Weekly backup
We will also make a copy of the entire Data Lake, on a weekly basis. These weekly backups are stored in a separate container in the backup Storage Account, called weekly.
The Azure DevOps pipelines
Before we dive into the details, I’d like to express a big thank you to Julian Kramer, a great friend at Macaw. He made the YAML pipelines and PowerShell script described here. All credits go to him! It was fun working on these, thanks Julian  !
!
We will call the AzCopy utility from a PowerShell script, and that script will be called from an Azure DevOps pipeline job step. This is a convenient way to execute such a script on the Azure DevOps agent machine, and a convenient way to create and manage the schedule(s) of the script.
The diagram below shows how the YAML and PowerShell files relate:
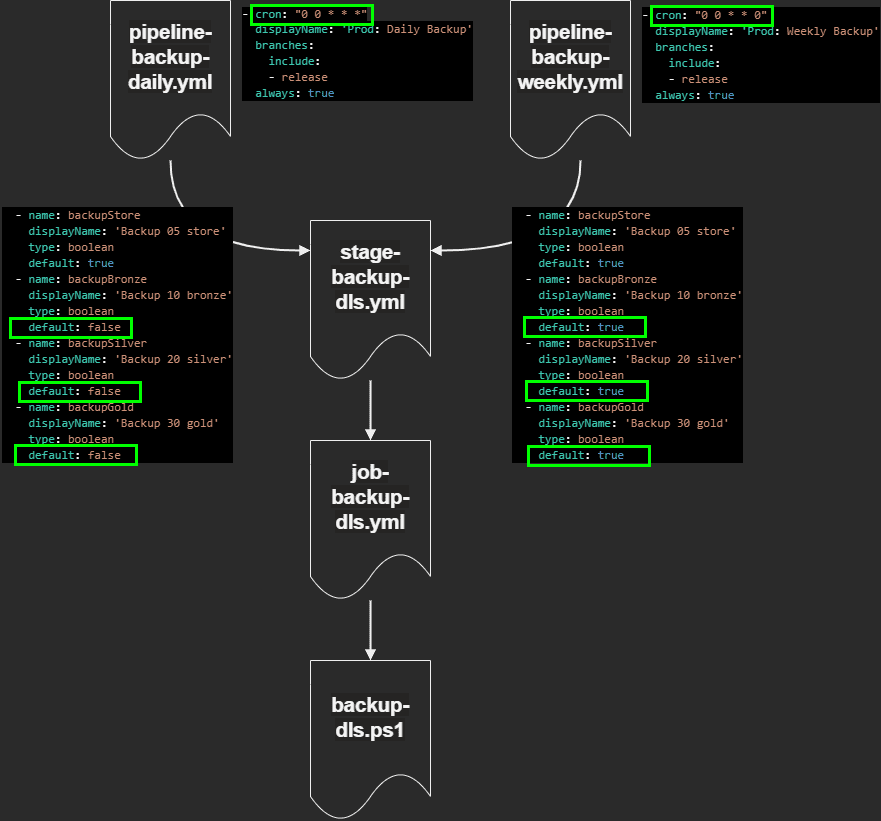
It would simply take too much space to post all these files here entirely, so I will just refer to the Gists in my GitHub. These files are environment-specific anyways, but I hope they can serve as an example for you, to make your own versions of these YAML pipelines and PowerShell script.
- pipeline-backup-daily.yml
- pipeline-backup-weekly.yml
- stage-backup-dls.yml
- job-backup-dls.yml
- backup-dls.ps1
Data lifecycle management policies
Lifecycle management uses rules to automatically move blobs to cooler tiers or to delete them. It’s possible to create a rule in the Azure Portal, using a wizard or by editing the JSON code of the rule(s) directly. If you want to learn more about this feature, please check out Microsoft Docs.
Backup storage account
The policy below is used on the secondary storage account that contains the backup copies of the Data Lake (copied there using the Automated Backup Process). This will apply retention of 60 days to the weekly backups, and retention of 30 days to the daily (incremental) backups.
| { | |
| "rules": [ | |
| { | |
| "enabled": true, | |
| "name": "weeklybackupsrule", | |
| "type": "Lifecycle", | |
| "definition": { | |
| "actions": { | |
| "baseBlob": { | |
| "delete": { | |
| "daysAfterModificationGreaterThan": 60 | |
| } | |
| } | |
| }, | |
| "filters": { | |
| "blobTypes": [ | |
| "blockBlob" | |
| ], | |
| "prefixMatch": [ | |
| "weekly" | |
| ] | |
| } | |
| } | |
| }, | |
| { | |
| "enabled": true, | |
| "name": "dailybackupsrule", | |
| "type": "Lifecycle", | |
| "definition": { | |
| "actions": { | |
| "baseBlob": { | |
| "delete": { | |
| "daysAfterModificationGreaterThan": 30 | |
| } | |
| } | |
| }, | |
| "filters": { | |
| "blobTypes": [ | |
| "blockBlob" | |
| ], | |
| "prefixMatch": [ | |
| "daily" | |
| ] | |
| } | |
| } | |
| } | |
| ] | |
| } |
Data Lake storage account
The policy below is used on the primary storage account of the Data Lake. This will ensure new data in the dls/05_store/_archive folder of the lake is automatically assigned to the cool access tier.
| { | |
| "rules": [ | |
| { | |
| "enabled": true, | |
| "name": "daily-moving-data-lake-store-archive-to-cool", | |
| "type": "Lifecycle", | |
| "definition": { | |
| "actions": { | |
| "baseBlob": { | |
| "tierToCool": { | |
| "daysAfterModificationGreaterThan": 0 | |
| } | |
| } | |
| }, | |
| "filters": { | |
| "blobTypes": [ | |
| "blockBlob" | |
| ], | |
| "prefixMatch": [ | |
| "dls/05_store/_archive" | |
| ] | |
| } | |
| } | |
| } | |
| ] | |
| } |
Storage Account access tiers
Each Azure Storage account has a default access tier, either hot or cool. Data in the cool tier is significantly cheaper. For the primary Data Lake account, we configure the access tier to hot. For the secondary backup account, we configure the access tier to cool. Learn more in the Azure Docs.
Backup vault
Besides the weekly/incremental backups, it is also wise to store certain data indefinitely. Remember, the weekly and incremental backups are not stored indefinitely (they will be automatically removed after the retention period, to lower storage costs).
For example, when a data source system is becoming deprecated. And the data source system is no longer accessible. The data ingested up until that moment would be a suitable candidate to store in the backup vault. You take a snapshot of the data and store it forever.
For this purpose, the backup storage account has a root folder (container) called vault to facilitate the backups that need to be kept indefinitely.
If data needs to be copied to the vault location, this can be done manually. Either with the tool Microsoft Azure Storage Explorer or by using an Azure Data Factory copy activity.
Cost
This Data Lake Backup Strategy will incur additional costs in your Azure environment, no surprise there I hope  . I encourage you to have a clear cost baseline before you implement this strategy. Know how large your data
Also, be aware that size reductions (in terms of MB) and reductions in the number of files in your Data Lake(house) can really help to limit the (increase of) cost related to the implementation of this strategy. If you have 1TB in your primary Data Lake storage account, this can easily be 2TB, 10TB, or more in your secondary Backup storage account, depending on your retention period configurations, etc. The cost of 1TB might be well within your budget, but will 1+10TB still be in your budget? Keep an eye out for any size or volume reduction that can be applied in your Data Lake(house), to reduce the cost impact of your backup strategy.
The areas where (an increase of) costs are to be expected:
- Having a secondary Storage Account for the backups.
- Enabling soft delete for blobs on your primary Storage Account.

Pingback: Automatic Backups on a Data Lake or Lakehouse – Curated SQL
Hello Dave,
This is an excellent article and really useful. Can you also help to furnish info’ on what is the best way to restore ADLS Gen2 from backups?
Pingback: TWIL: December 26, 2022 – André Vala